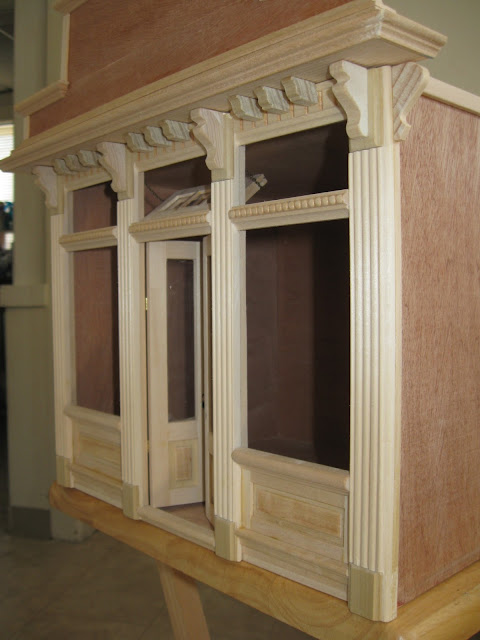
Fini
 |
| 3 weeks work... |
 |
The strip of wood at the bottom was cut with a coarse band saw blade
to create a rough stone (granite?) effect. And its top edge is beveled.
|
 |
| The sign was a bit floppy so I added brackets. |
 |
| 3 weeks work... |
 |
The strip of wood at the bottom was cut with a coarse band saw blade
to create a rough stone (granite?) effect. And its top edge is beveled.
|
 |
| The sign was a bit floppy so I added brackets. |
 |
| Filled in & sanded (top not glued) |
 |
| Filled in & sanded windows & grilles. (All the acrylics are removable) |
 |
| Hinged doors & transom, plus chain. |
 |
| Added raised panels to doors & under windows. |
 |
| Added small brackets to front & large bracket on each side (top not glued) |
 |
| Sign almost finished - just need to add some decorations. Grilles done. Still need to add a few brackets, panels below windows & on doors, hinge transom & doors... |
 |
| Dry fit for the windows, doors & panels. (the plastic film is still on the windows) I need to trim & adjust the positioning then add the grilles. |
 |
| Max gives his nod of approval! |
 |
...getting an idea of what the grilles will look like. Also stuck the door handles on. All temporary :)
|
 |
| Bought some full size molding at Home Depot to slice into brackets. These 2 were sold by the foot so I only bought 1 foot ea. The slices are about 1/4" wide. I think I like them :) |
 |
| Here is the dry fit of the store front. Its entirely made up of Tiny Trim. The 2 outer fluted columns will be routed to curve around the sides. The top & bottom look a bit bowed - I guess I was too close with camera :) |
 |
Took a piece of 3/4" poplar & routed the edges using two different bits.
Left: TR621 3/16” Carbide Beading Bit
Right: TR627 1/8” Carbide Roman Ogee Bit
|
 |
| Cut (rip) the routed board in halves. |
 |
| Slice (cross-cut) 1/4" pieces |
 |
| Put the two brackets together or use separately. Flip them around for different styles. |
 |
| Or layered - as Idske commented in a previous post. |
 |
| The ones with a carved or embossed design can be sliced evenly in between the decorations to create a more sculptured or carved look. |
 |
| Here I sliced embossed Tiny Trim into brackets - the 1st 3 are from the same molding. The one on the far right looks more like a small shelf - maybe use it to hold a plant on the wall? |
 |
| Final drawing. Decided on double doors. Not sure about the brackets - will have to experiment with the Dremel Trio router bits. |
 |
| Tentative storefront facade. (not showing sign above) |
 |
| Inner frame (dry fit). This is the section of the storefront that friction fits into the box. The decorative or finished front will be glue to this frame. |
 |
| I used lap & dado joints for stronger construction. |
 |
| TR626 1/2" Straight bit (carbide) part of 3 pc TR750 set |
 |
| I cut a 1/4" groove in the top, sides & bottom. I cut the groove half the thickness of the plywood, about 3/32" deep, & about a 1/4" from the edge. |
 |
Using the chamfer bit I beveled the edges of the same 4 parts.
|
 |
| Dry fitting sides, top & bottom around back - which is fitted into groove. |
 |
| Back fitted snugly. |
 |
| Dry fitted front. (showing masking tape holding box together) |
 |
| Make sure the grooved side of each piece is aligned to the straight-edge. Then with masking tape tightly apply the tape while pulling the parts together - keeping them aligned to straight-edge. |
 |
| Carefully flip over the assembly. Notice that the grooved edges are all aligned at the bottom. |
 |
| Apply glue to all the bevels & grooves. |
 |
| Close up of glued areas. |
 |
| Fold the sides, top & bottom around the back & tightly tape the top & side to complete the box. |
 |
| Wipe off any glue squeeze-out. |
 |
| All seams cleaned. |
 |
| After the box has dried - glue & tape down the front trim. |
 |
| Box almost finished - just need to check for any gaps, if so I'll need to do some filling & a bit of light sanding.
Not too shabby for lauan!
|
 |
A sliding plexiglas front could be fitted at this point, but I think I'll do a storefront instead. It will fit snugly & will be removable.
|