Saturday, May 19, 2012

Modular stick built collapsible dollhouse 19


To see entire project click here


Door & steps just for placement (not using either.)  Foundation done. Will have Mansard roof.

City sidewalk. Corner lot...

Possible front door design - frosted glass - black area will be clear after cleaning.

Mansard roof work up.

Roof will be faux copper/verdigris & ribbed. Moldings will be faux copper also.


...On the Verge of a Nervous Breakthrough...

All photos & images created by Mike's Miniatures on this blog are the property of Mike's Miniatures - copyright 2012

Saturday, May 12, 2012

Modular stick built collapsible dollhouse 18


To see entire project click here


Finished lattice, framing & windowStill playing around with colors - will probably do the posts, trim & lattice the darker shade? Might do a copper verdigris hip roof?


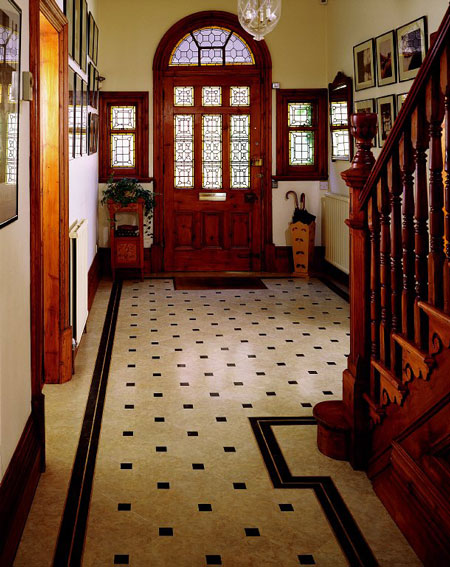
Inspirational floor photo. designs courtesy of Amtico® Tile - All rights reserved. 

I drew this floor in CorelDraw. I'll have this floor copied at Staples, draw some embossed lines on it, then seal it. I'm think'n of doing the entryway with bead board from floor to ceiling & on the ceiling - in an a light to medium oak.


...On the Verge of a Nervous Breakthrough...

All photos & images created by Mike's Miniatures on this blog are the property of Mike's Miniatures - copyright 2012

Thursday, May 10, 2012

Modular stick built collapsible dollhouse 17

Finished siding on main house, starting entry

T
o see entire project click here

Finally got some sun here in Rhode Island! Wall to the right almost done. Started entryway (background through arch)
Front door will face (photo-right) with lantern on wall, maybe with a window on side & window seat inside.  Might do an all bead board interior, not too dark. Underneath will be posts & lattice, wooden steps in front.  Maybe some paver bricks connecting to the city sidewalk... 

Not sure what type of roof yet??


...On the Verge of a Nervous Breakthrough...

All photos & images created by Mike's Miniatures on this blog are the property of Mike's Miniatures - copyright 2012

Saturday, May 5, 2012

Modular stick built collapsible dollhouse 16

To see entire project click here


Testing electrical connections...

Back roof shingles done, need to do edge trim around cut-out & ridge.

All electrical connections working.


Back of house...need to paint windows & finish foundation...


Front roof...ridge board not glued down yet...


...On the Verge of a Nervous Breakthrough...

All photos & images created by Mike's Miniatures on this blog are the property of Mike's Miniatures - copyright 2012

Wednesday, April 25, 2012

Modular stick built collapsible dollhouse 15


To see entire project click here

Started front wall: 

The archway is cut out. Above arch added 5.5mm plywood + poster board to = 1/4" thickness, cut on band saw, will finish with inside trim (veneer or poster board.) String between window & archway for outdoor & entry wiring.

2nd floor:  
Did an old painted floor upstairs - needs more sanding tho. 

Opening on the right is for spiral staircase.

Framing & windows done in main section.  Need to do entry addition & wrought iron spiral staircase.  Thats all, LOL...


Inspirational photo.  elite spiral stairs  
Now all I need to do is make some kind of mold to cast each of the 15 steps I'll need :) The railing can be made from a heavy gauge wire & the balusters maybe twisted wire, solder it all together & presto - Victorian staircase!


This is only a mock up of the spiral staircase. 
Cut mat board treads (wedges), used hole punch to fit them over 3/16" dowel...

Its not as big & intrusive as I thought it might be...

...On the Verge of a Nervous Breakthrough...

All photos & images created by Mike's Miniatures on this blog are the property of Mike's Miniatures - copyright 2012

Monday, April 23, 2012

Modular stick built collapsible dollhouse 14


To see entire project click here

1st floor, made from a real life size floor board, gum wood, I think.  Sliced into 1/16" thick strips.  The floor boards are 1/4" wide @ 1/12 scale = 3", staggered @ 2" or 24" scale.  I used wood glue then set weight on overnight.  And finally I sanded .

Added 3 coats butcher's block wax/condition.  Won't be quite as shiny when it dries.

Wallpaper glued.  Window casing, crown molding & chair rail dry fitted.  I made the corner blocks  out of wood with a molded flower design made from polymer clay.

I'm thinking of added a faux tin ceiling??


Some staging: I guess this will be some kind of office with a spiral staircase in the corner to save some space (paint can.)  Behind the figure is an archway that will lead to an entry with a door facing to the left - as the left side of the office will be facing the street.

I finished the left wall, except for outlets - waiting for wiring.


...On the Verge of a Nervous Breakthrough...

All photos & images created by Mike's Miniatures on this blog are the property of Mike's Miniatures - copyright 2012


Friday, April 20, 2012

Modular stick built collapsible dollhouse 13

Paint & wallpaper...


To see entire project click here


The darker shade is a grayish-olive, the lighter is the same hue but lighten with white.

need to put some kind of block type decoration on the corner trim where the two colors meet.

I used the lighter exterior color on the interior woodwork & printed the B&W wallpaper design on cream colored paper - added a grey stripe behind some of the pattern to soften it a bit?


...On the Verge of a Nervous Breakthrough...

All photos & images created by Mike's Miniatures on this blog are the property of Mike's Miniatures - copyright 2012


Thursday, April 19, 2012

Modular stick built collapsible dollhouse 12

Page 11


More progress...


To see entire project click here

Interior wall covered with bead board, baseboard & mat board (plaster.) Need to wallpaper upper half of 1st floor wall before attaching chair rail & crown molding. Notice the bead board & the mat board are flush - window covers nicely...


I will attach a gingerbread board between the 1st & 2nd floor.  Then I need to paint all the woodwork - then glue all the siding down. 

Got to go buy some paint & wiring...& maybe print some wallpaper!!


B&W photo closeup showing wallpaper, chair rail & bead board.

...On the Verge of a Nervous Breakthrough...

All photos & images created by Mike's Miniatures on this blog are the property of Mike's Miniatures - copyright 2012